¶ Description
Geocode some postal addresses.
¶ Parameters
¶ Parameters tab
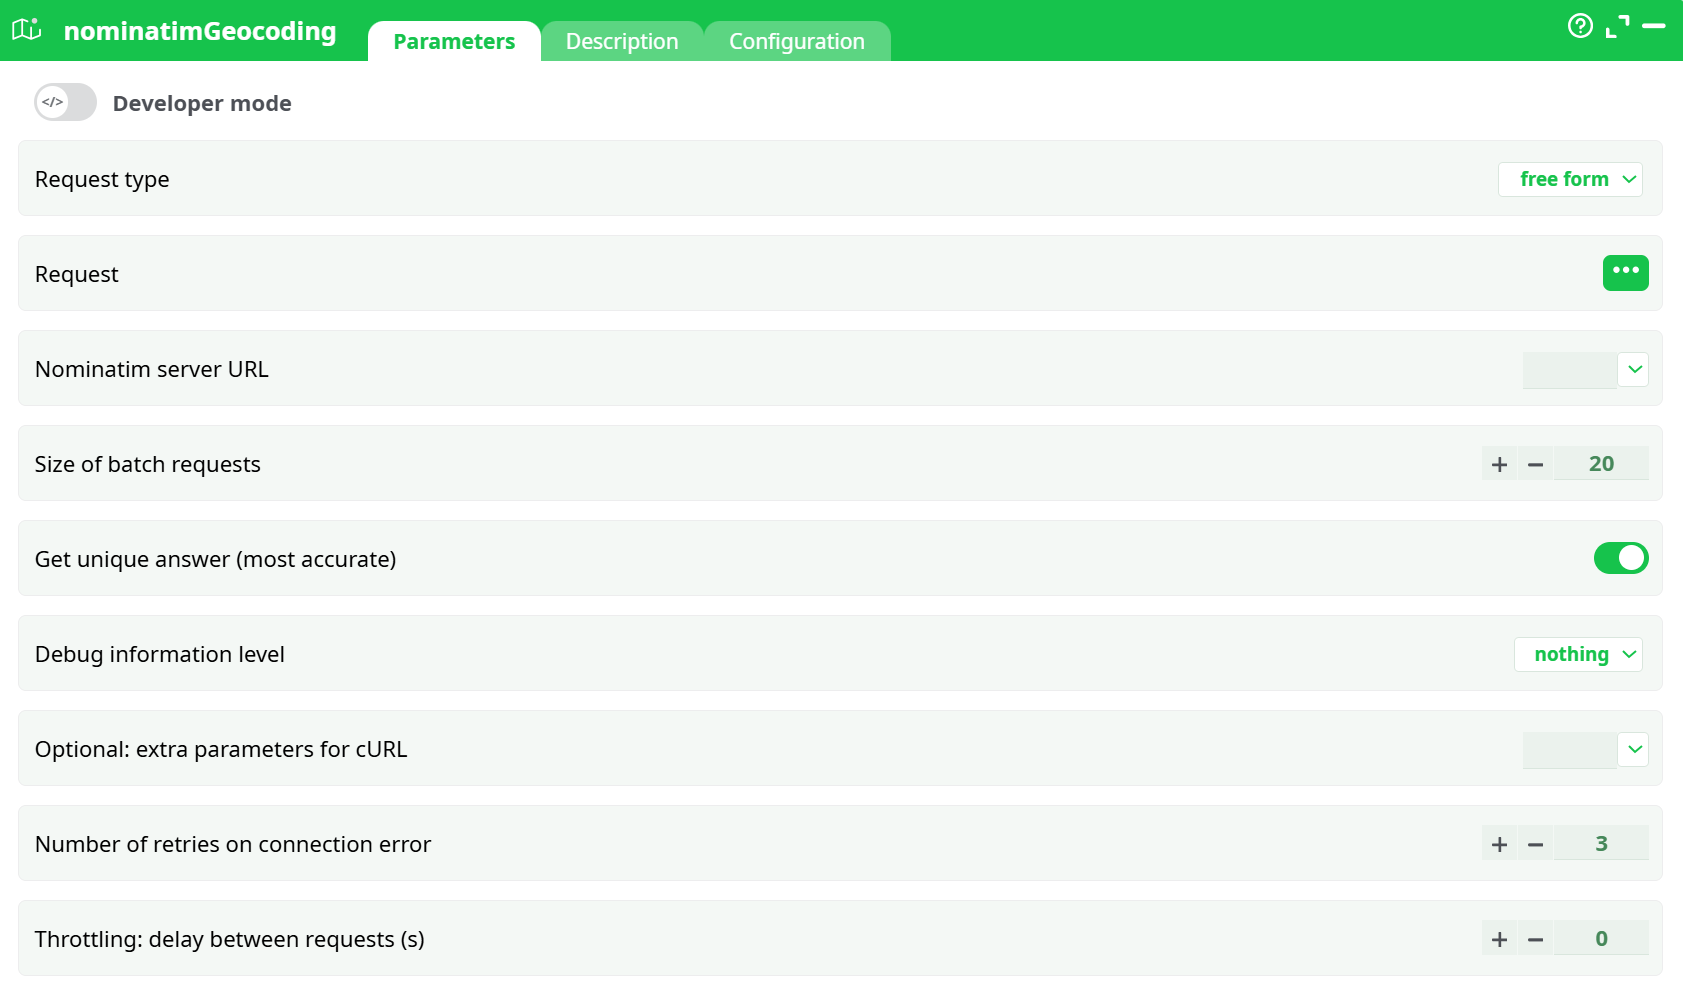
Parameters:
- Request Type
- Request
- Nominatim server URL
- Size of batch requests
- Get unique answer (most accurate)
- Debug information level
- Optional: extra parameters for cURL
- Retries on connection error
- Throttling: delay between requests (s)
¶ Description tab
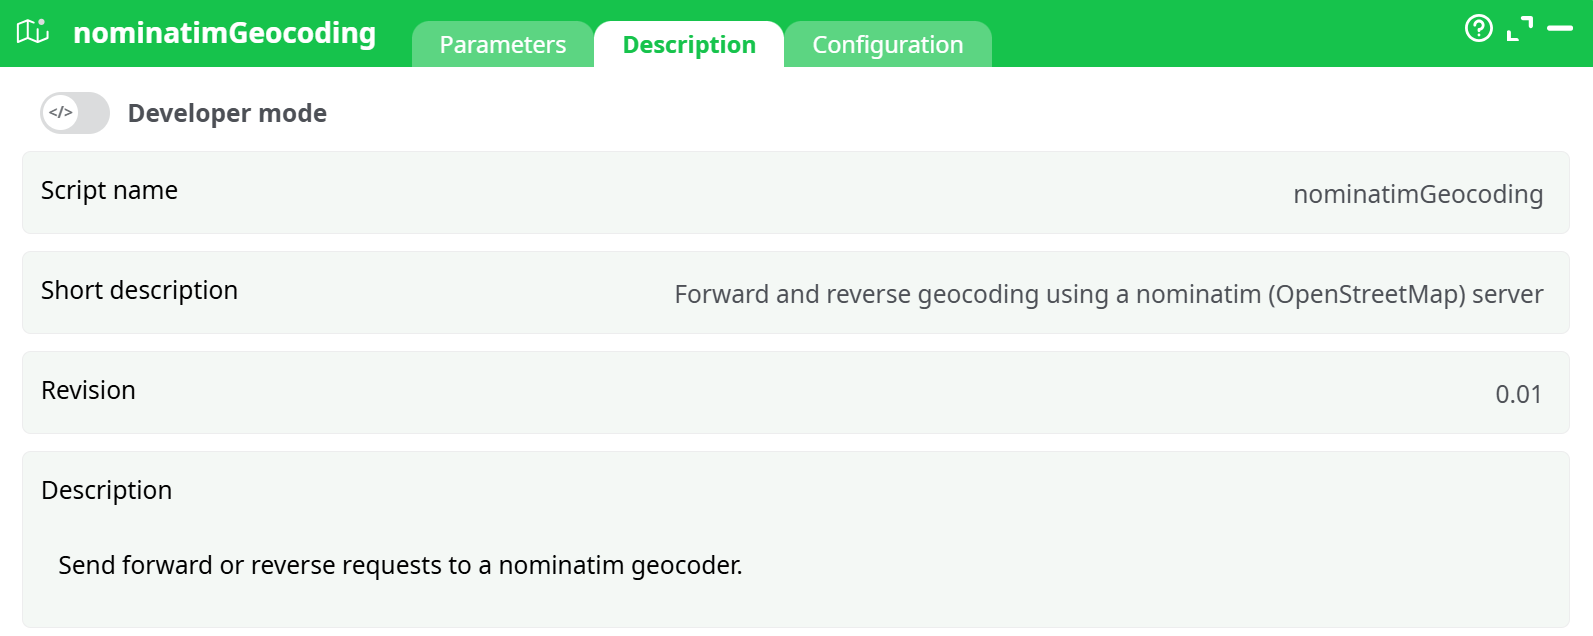
Parameters:
- Script name
- Short description
- Revision
- Description
¶ Configuration tab
See dedicated page for more information.
¶ About
This action takes as input some postal addresses (either stored in “free-form” or stored in “structured form”) and returns:
- The latitude & longitude of the postal addresses.
- Other fields: boundingBox1, boundingBox2, boundingBox3, boundingBox4, display_name, type, importance, address_house_number, address_road, address_city_district, address_town, address_county, address_state, address_region, address_postcode, address_country, address_country_code, Polygon.
ETL offers many different engines to geocode addresses. You can use:
- The “Google Map” or the “Geocode Farm” engine is the most expensive solution.
- The “MS Bing” engine is a paid solution if you need to geocode more than 125000 addresses per year. This solution tends to become rather expensive when you need to geocode large volumes of data.
- The current nominatimGeocode action. This solution is 100% free. The nominatimGeocode action allows to geocode an unlimited number of postal addresses without paying anything.
Behind the scenes, this action sends “geocoding requests” to a geocoding server based on the “nominatim” technology. These “geocoding requests” are grouped into batch of P10 addresses (the default value for the parameter P10 is 50, meaning that ETL is sending to the nominatim server batches of 50 addresses to geocode). A larger value for the parameter P10 means a (slightly) reduced computing time.
The “nominatim” geocoding server can be:
-
The free server from the open-streemap association.
To access this server, use as parameter P9 (the url): https://nominatim.openstreetmap.org. This server has some limitations:- The parameter P10 (batch request size) must be 1
- The parameter P15 (seconds to sleep between each call) must be, at least, 1.
-
A pre-compiled nominatim server directly available inside a VM that is just “ready to be used”. You can download this “ready to be used” nominatim server for free from here: http://bigfiles.timi.eu/nominatim/
Warning: This is a big download (around 107GB to download). To use this VM, you need to decompress it (e.g. using winrar) and execute it inside the VMWare Player software that you can download for free from the VMWare website. Inside this VM:- The “root” password is “example” (without the quotes)
- The default user login is “example” and his password is “example” (without the quotes)
The last update date of the maps included inside this “ready to be used” nominatim server is 2021/5. This server accepts batch requests (parameter P10) of any size. To access this server, you’ll typically use as parameter P9 (the “url”): http://192.168.23.129:8081/nominatim You can&should also set the parameter P15 (the “seconds to sleep between each call”) to zero.
-
Your own nominatim server. The main advantage of building your own nominatim server is to get the most up-to-date maps from “open street map”.
¶ Building your own Nominatim Server.
We copied the majority of the steps from the Nominatim install guide and we modified slightly where we got blocked (so if this document gets outdated, please visit https://nominatim.org/release-docs/latest/admin/Installation/) for the updated steps.
Here we will follow the steps for a Ubuntu 20 installation.
The recommended mininum HW requirements are:
- HardDisk : +/- 1TB ( NVME disks is recommended)
- RAM : 40GB for EU (64GB for global coverage)
- Fast CPU
- Ubuntu 18 or 20
The startpoint is to have an “empty” ubuntu action (inside a VM or not).
¶ Installing the Required Software
These instructions expect that you have a freshly installed Ubuntu 20.04.
Make sure all packages are are up-to-date by running:

Now you can install all packages needed for Nominatim:

sudo apt install -y php-cgi
sudo apt install -y build-essential cmake g++ libboost-dev libboost-system-dev
libboost-filesystem-dev libexpat1-dev zlib1g-dev
libbz2-dev libpq-dev libproj-dev
postgresql-server-dev-12 postgresql-12-postgis-3
postgresql-contrib-12 postgresql-12-postgis-3-scripts
php php-pgsql php-intl libicu-dev python3-dotenv
python3-psycopg2 python3-psutil python3-jinja2 python3-icu
¶ System Configuration
The following steps are meant to configure a fresh Ubuntu installation for use with Nominatim. You may skip some of the steps if you have your OS already configured.
1. Creating Dedicated User Accounts
Nominatim will run as a global service on your machine. It is therefore best to install it under its own separate user account. In the following we assume this user is called nominatim and the installation will be in /srv/nominatim. To create the user and directory run:

To be able to copy and paste instructions from this manual, export user name and home directory now like this:

Never, ever run the installation as a root user. You have been warned.
Make sure that system servers can read from the home directory:

¶ Setting up & Tune PostgreSQL
You might want to tune your PostgreSQL installation so that the later steps make best use of your hardware. You should tune the following parameters in your postgresql.conf file.
(postgresql.conf is for ubuntu & postgres 12 in /etc/postgres/12/main/ )
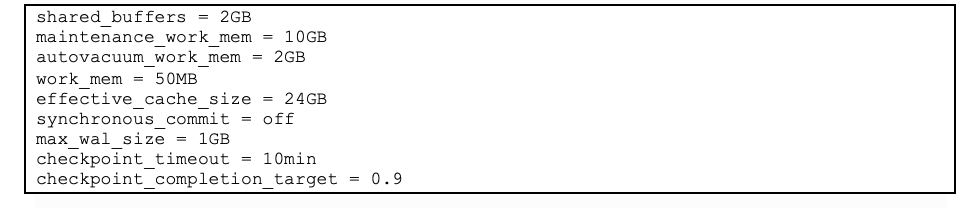
The numbers above seem to work fine for 64GB RAM machine. Adjust to your setup (i.e. make sure you have enough RAM!). A higher number for max_wal_size means that PostgreSQL needs to run checkpoints less often but it does require additional space on your disk.
Restart the postgresql service after updating the above config file:

Finally, we need to add two postgres users: One for the user that does the import and another for the webserver which should access the database for reading only:

¶ Installing the Nominatim code
1. Building and Configuration
Get the source code for the release and unpack it:

The code must be built in a separate directory. Create this directory, then configure Nominatim in there:

2. Setting up a webserver (Apache)
The webserver should serve the php scripts from the website directory of your project directory. Therefore, set up a project directory and populate the website directory:

Apache has a PHP module that is reauired for Nominatim. To install this module run:

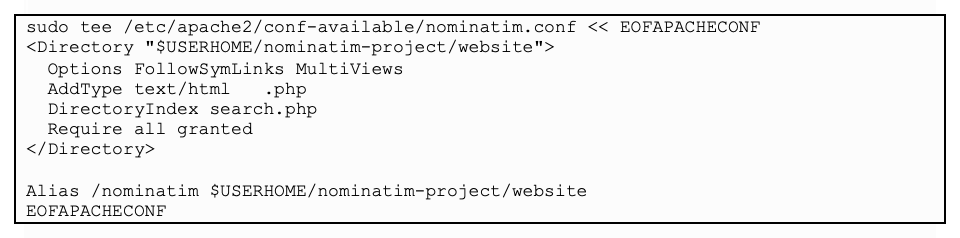
You need to create an alias to the website directory in your apache configuration. Add a separate nominatim configuration to your webserver:
Then restart apache:

The Nominatim API is now available at http://localhost/nominatim/.
¶ Importation 1: Creating the Project directory
Before you start the import, you should create a project directory for your new database installation. This directory receives all data that is related to a single Nominatim setup: configuration, extra data, etc. Create a project directory apart from the Nominatim software and change into the directory:

In the following, we refer to the project directory as $PROJECT_DIR. To be able to copy&paste instructions, you can export the appropriate variable:

The Nominatim tool assumes per default that the current working directory is the project directory but you may explicitly state a different directory using the --project-dir parameter. The following instructions assume that you run all commands from the project directory.
¶ Importation 2: Configuration setup in .env
The Nominatim server can be customized via an .env configuration file in the project directory. This is a file in dotenv format which looks the same as variable settings in a standard shell environment. You can also set the same configuration via environment variables. All settings have a NOMINATIM_ prefix to avoid conflicts with other environment variables.

¶ Importation 3: Enable Flatnode storage
If you plan to import a large dataset (e.g. Europe, North America, planet), you should also enable flatnode storage of node locations. With this setting enabled, node coordinates are stored in a simple file instead of the database. This will save you import time and disk storage. Add to your .env:

Replace the second part with a suitable path on your system and make sure the directory exists. There should be at least 75GB of free space.
¶ Importation 4: Additional optional download: Wikipedia/Wikidata rankings
Wikipedia can be used as an optional auxiliary data source to help indicate the importance of OSM features. Nominatim will work without this information but it will improve the quality of the results if this is installed. This data is available as a binary download. Put it into your project directory:

The file is about 400MB and adds around 4GB to the Nominatim database. We didn’t perform this step to create the VM that contains the “ready to be used” nominatim server.
¶ Importation 5: Additional optional download: Great Britain& USA postcodes
Nominatim can use postcodes from an external source to improve searches that involve a GB or US postcode. This data can be optionally downloaded into the project directory:

¶ Importation 6: Get and load the map data
If you only need geocoding for a smaller region, then precomputed OSM extracts are a good way to reduce the database size and import time. Geofabrik offers extracts for most countries. They even have daily updates which can be used with the update process described in this webpage. There are also other providers for extracts. Please be aware that some extracts are not cut exactly along the country boundaries. As a result, some parts of the boundary may be missing which means that Nominatim cannot compute the areas for some administrative areas.
You can now download the data extract for the region of your interest:
- You can find the continents here : https://download.geofabrik.de/
- Or for EU countries : https://download.geofabrik.de/europe.html

Issue the following command from the project directory to start the import (The official guide says to start from the build directory but this did not work):
nominatim import --osm-file 2>&1 | tee setup.log
Warning: The above step takes more than 48 hours!
NOTE :
If you get a database error your user can’t access the data add the users :
Sudo su postgres
Psql
Create user <>:
grant all privileges on database nominatim to <>;
\q
ExitIf the import fails and you want to retry, it is easier to remove the Nominatim database:
Sudo su postgres
Psql
Drop database nominatim
¶ Importation 7: Notes on full planet imports
Even on a perfectly configured machine the import of a full planet takes around 2 days. Once you see messages with Rank .. ETA appear, the indexing process has started. This part takes the most time. There are 30 ranks to process. Rank 26 and 30 are the most complex. They take each about a third of the total import time. If you have not reached rank 26 after two days of import, it is worth revisiting your system configuration as it may not be optimal for the import.
¶ Importation 8: Testing the installation

This runs a small test server normally used for development. You can use it to verify that your installation is working. Go to http://localhost:8088/status.php and you should see the message OK. You can also run a search query, e.g. http://localhost:8088/search.php?q=Berlin.

¶ Enable bulk api requests