A pipeline consists of a processing chain based on actions linked together.
In this chapter, we describe the main design activities:
- Searching relevant actions
- Adding an action
- Configuring an action
- Connecting actions together
- Finalizing pipeline
¶ Searching relevant actions
All processing actions are available in the catalogue located in the right panel
(see Actions catalogue).
Actions are organized into main categories (Input, Transformation, Output) and sub-categories.
In the detailed list view, a description of each action is shown.
In compact view mode, this description is displayed on hover.
Using this list is helpful when you are exploring available functionality.
A search form is also available and allows you to search for actions by name.
This is the fastest method when you already know which action you need.
The search form supports regular expressions.
Below is an example of search results for "csv":

¶ Adding an action
To add a processing action to the pipeline, use drag and drop from the catalogue.
The user must locate the desired action in the catalogue and drag its icon into the design view (the canvas area).
When dropping an action, holding the Shift key will auto-connect it to the closest action on the left,
while holding the Ctrl key will auto-connect it to the closest action on the right.
Both keys can be used together.
If the left and right neighbors are already connected, the existing connection will be automatically removed first.
¶ Configuring an action
Each action has a set of parameters, potentially gathered in several tabs.
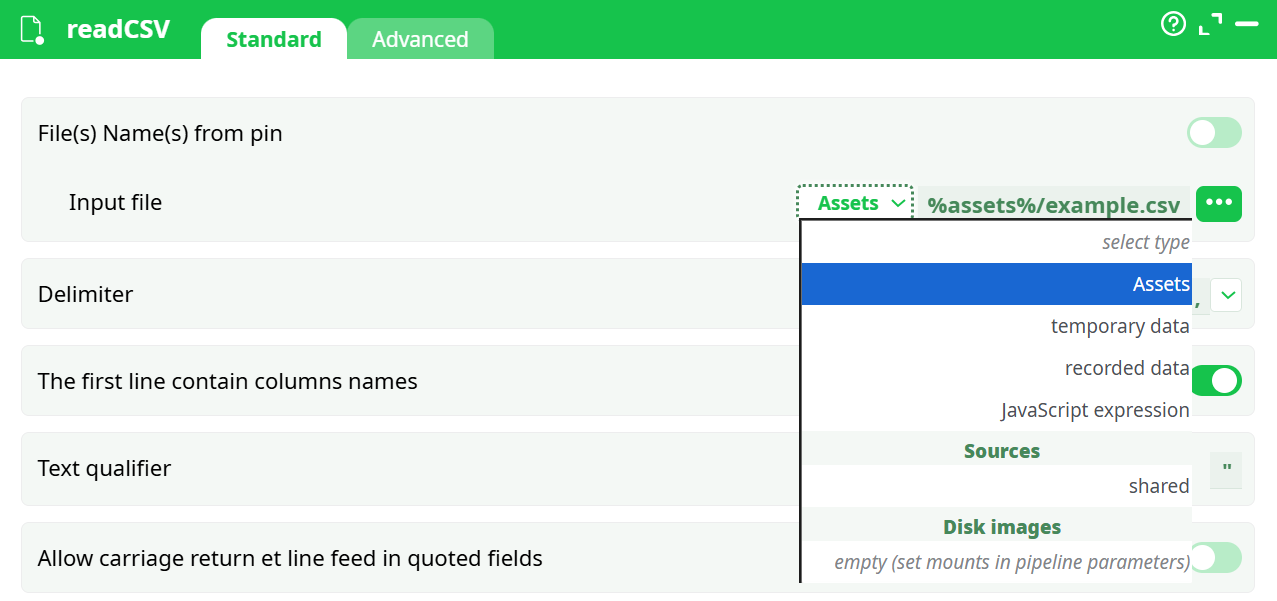
As an example, here is a view of the readCSV action parameters:
The minimalistic configuration consists in defining The name of the input file. Other parameters may be adjusted according to the file format or content.
¶ Connecting actions together
To execute a designed pipeline, the user must connect processing actions to one another, defining the execution path.
Linking actions serves two main purposes:
- Defines the execution order of actions for the ETL engine
- Passes the output of one action as the input to the next action
Each processing action has one or more input and/or output connection points, depending on its type.
Some actions allow the user to configure the number of input and output pins.
¶ Creating a Connection Between Actions
-
Move the mouse pointer over an input or output connection point.
When the connection point is highlighted (pink circle), click and drag toward the target action’s connection point. -
When the destination point is highlighted, release the mouse to confirm the connection.
A line will appear between the two connection points, representing the data flow within the pipeline. -
Keyboard shortcuts for connecting actions:
- C → When multiple boxes are selected, automatically connects compatible input/output pins between them.
- Shift + drag → Reassigns an existing connection to another input/output pin.
- Ctrl + Shift + drag → Swaps existing connections between multiple input pins (multi-input actions).

¶ Building a Simple ETL Workflow
The most common data workflow in the platform follows the Extract – Transform – Load (ETL) structure.
This example uses:
- readCSV → Extract data from a source
- Calculator → Transform the data
- writeCSV → Save processed results
- FinishLine → Indicate pipeline completion

¶ Step-by-Step Setup
¶ Step 1 — Extract (readCSV)
The readCSV action imports data from a chosen source.
Input file location options:
- Assets → predefined project assets, e.g.
%assets%/example.csv - Temporary data → transient files generated during testing
- Recorded data → results from previously saved processes
- JavaScript expression → dynamically defines the file name or path
- Sources → shared files
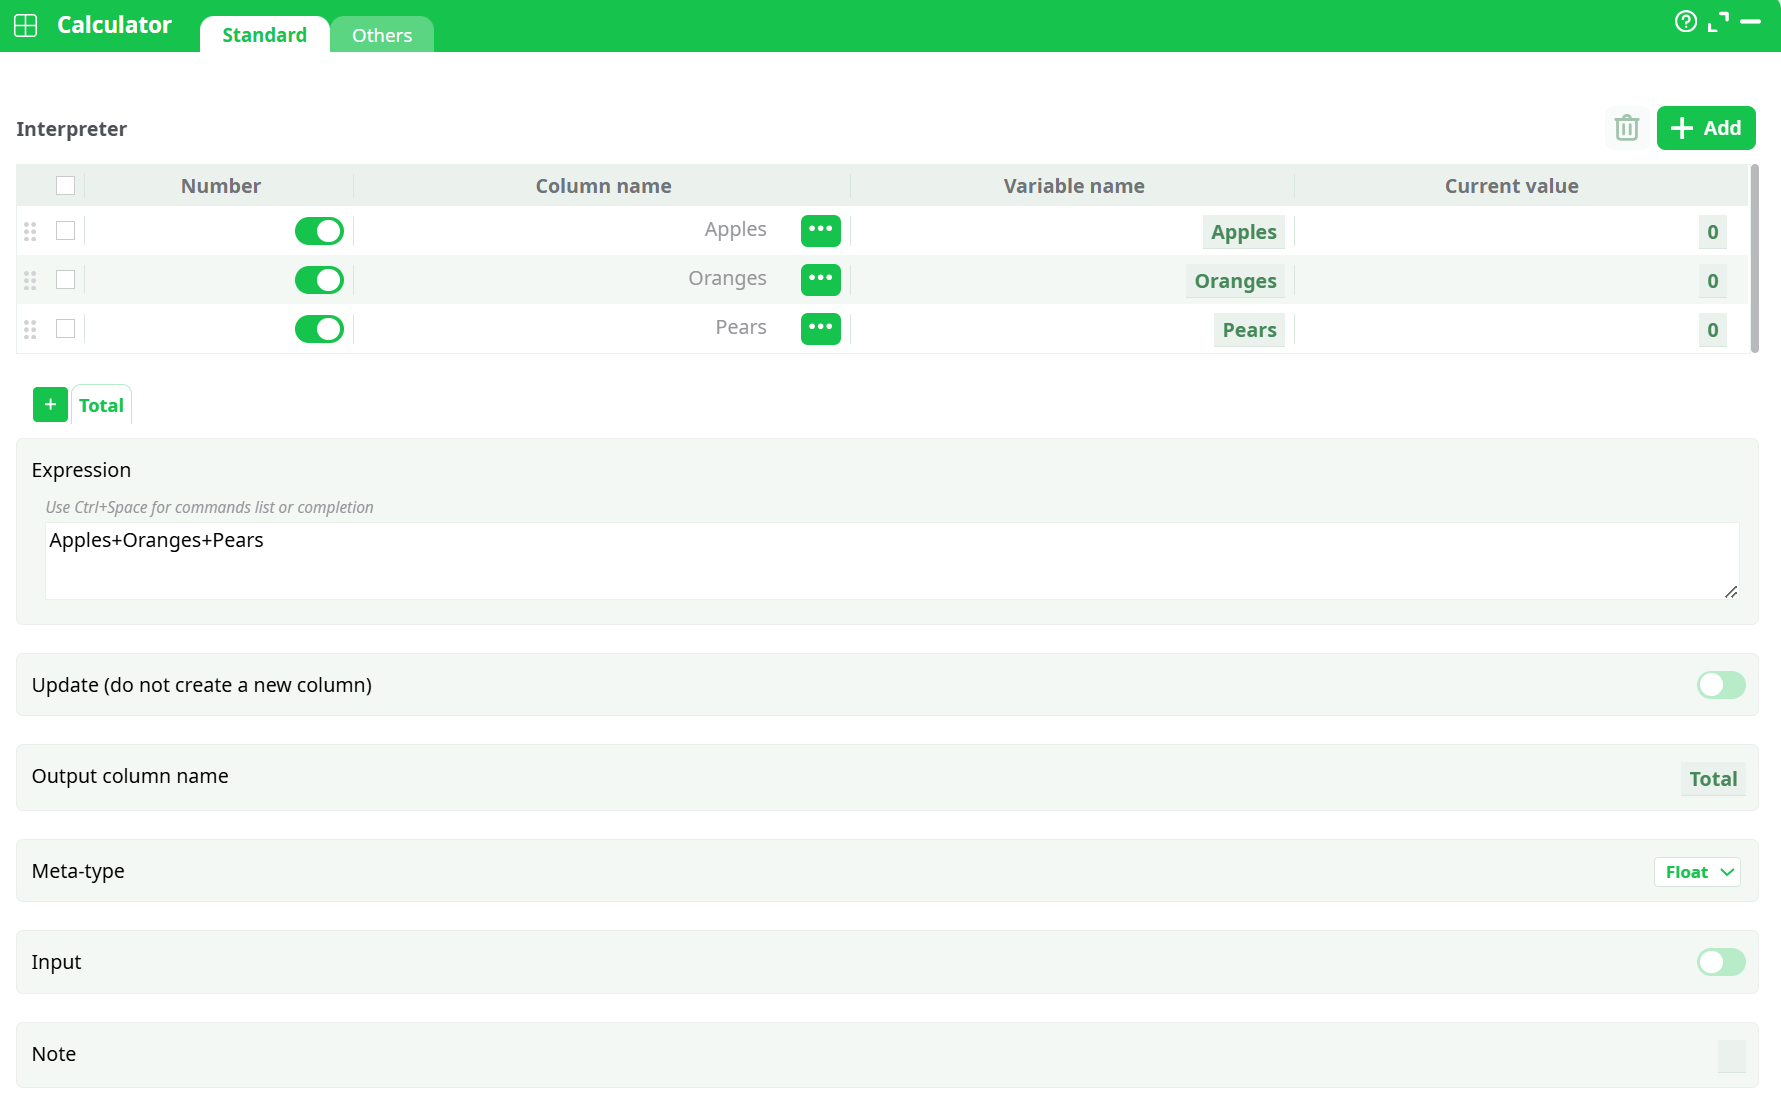
¶ Step 2 — Transform (Calculator)
The Calculator action performs custom operations using arithmetic or logical expressions.
Example:
Expression:
Apples + Oranges + Pears
Output column name:
Total
The expression sums the selected columns and outputs the result to a new column Total.
¶ Step 3 — Load (writeCSV)
The writeCSV action exports processed data to a selected destination.
Output file path options:
- Temporary data → quick preview during test runs
- Recorded data → permanent storage of pipeline results
- Assets → export into project assets folder
- JavaScript expression → allows programmatic path generation
Example (JavaScript expression):
">" + "records/totalexample.js"
After execution, you can find the output file under the Process → Records tab and download it if needed.

¶ Step 4 — Finalize (FinishLine)
To complete the pipeline and enable its execution, the user must add a RunToFinishLine processing action.
This action is mandatory in every pipeline, as it represents the final step of the execution chain.
If RunToFinishLine is not present in the pipeline design, ETL will not allow the pipeline to be executed.
¶ Next step
Now the pipeline is designed and ready to be executed.