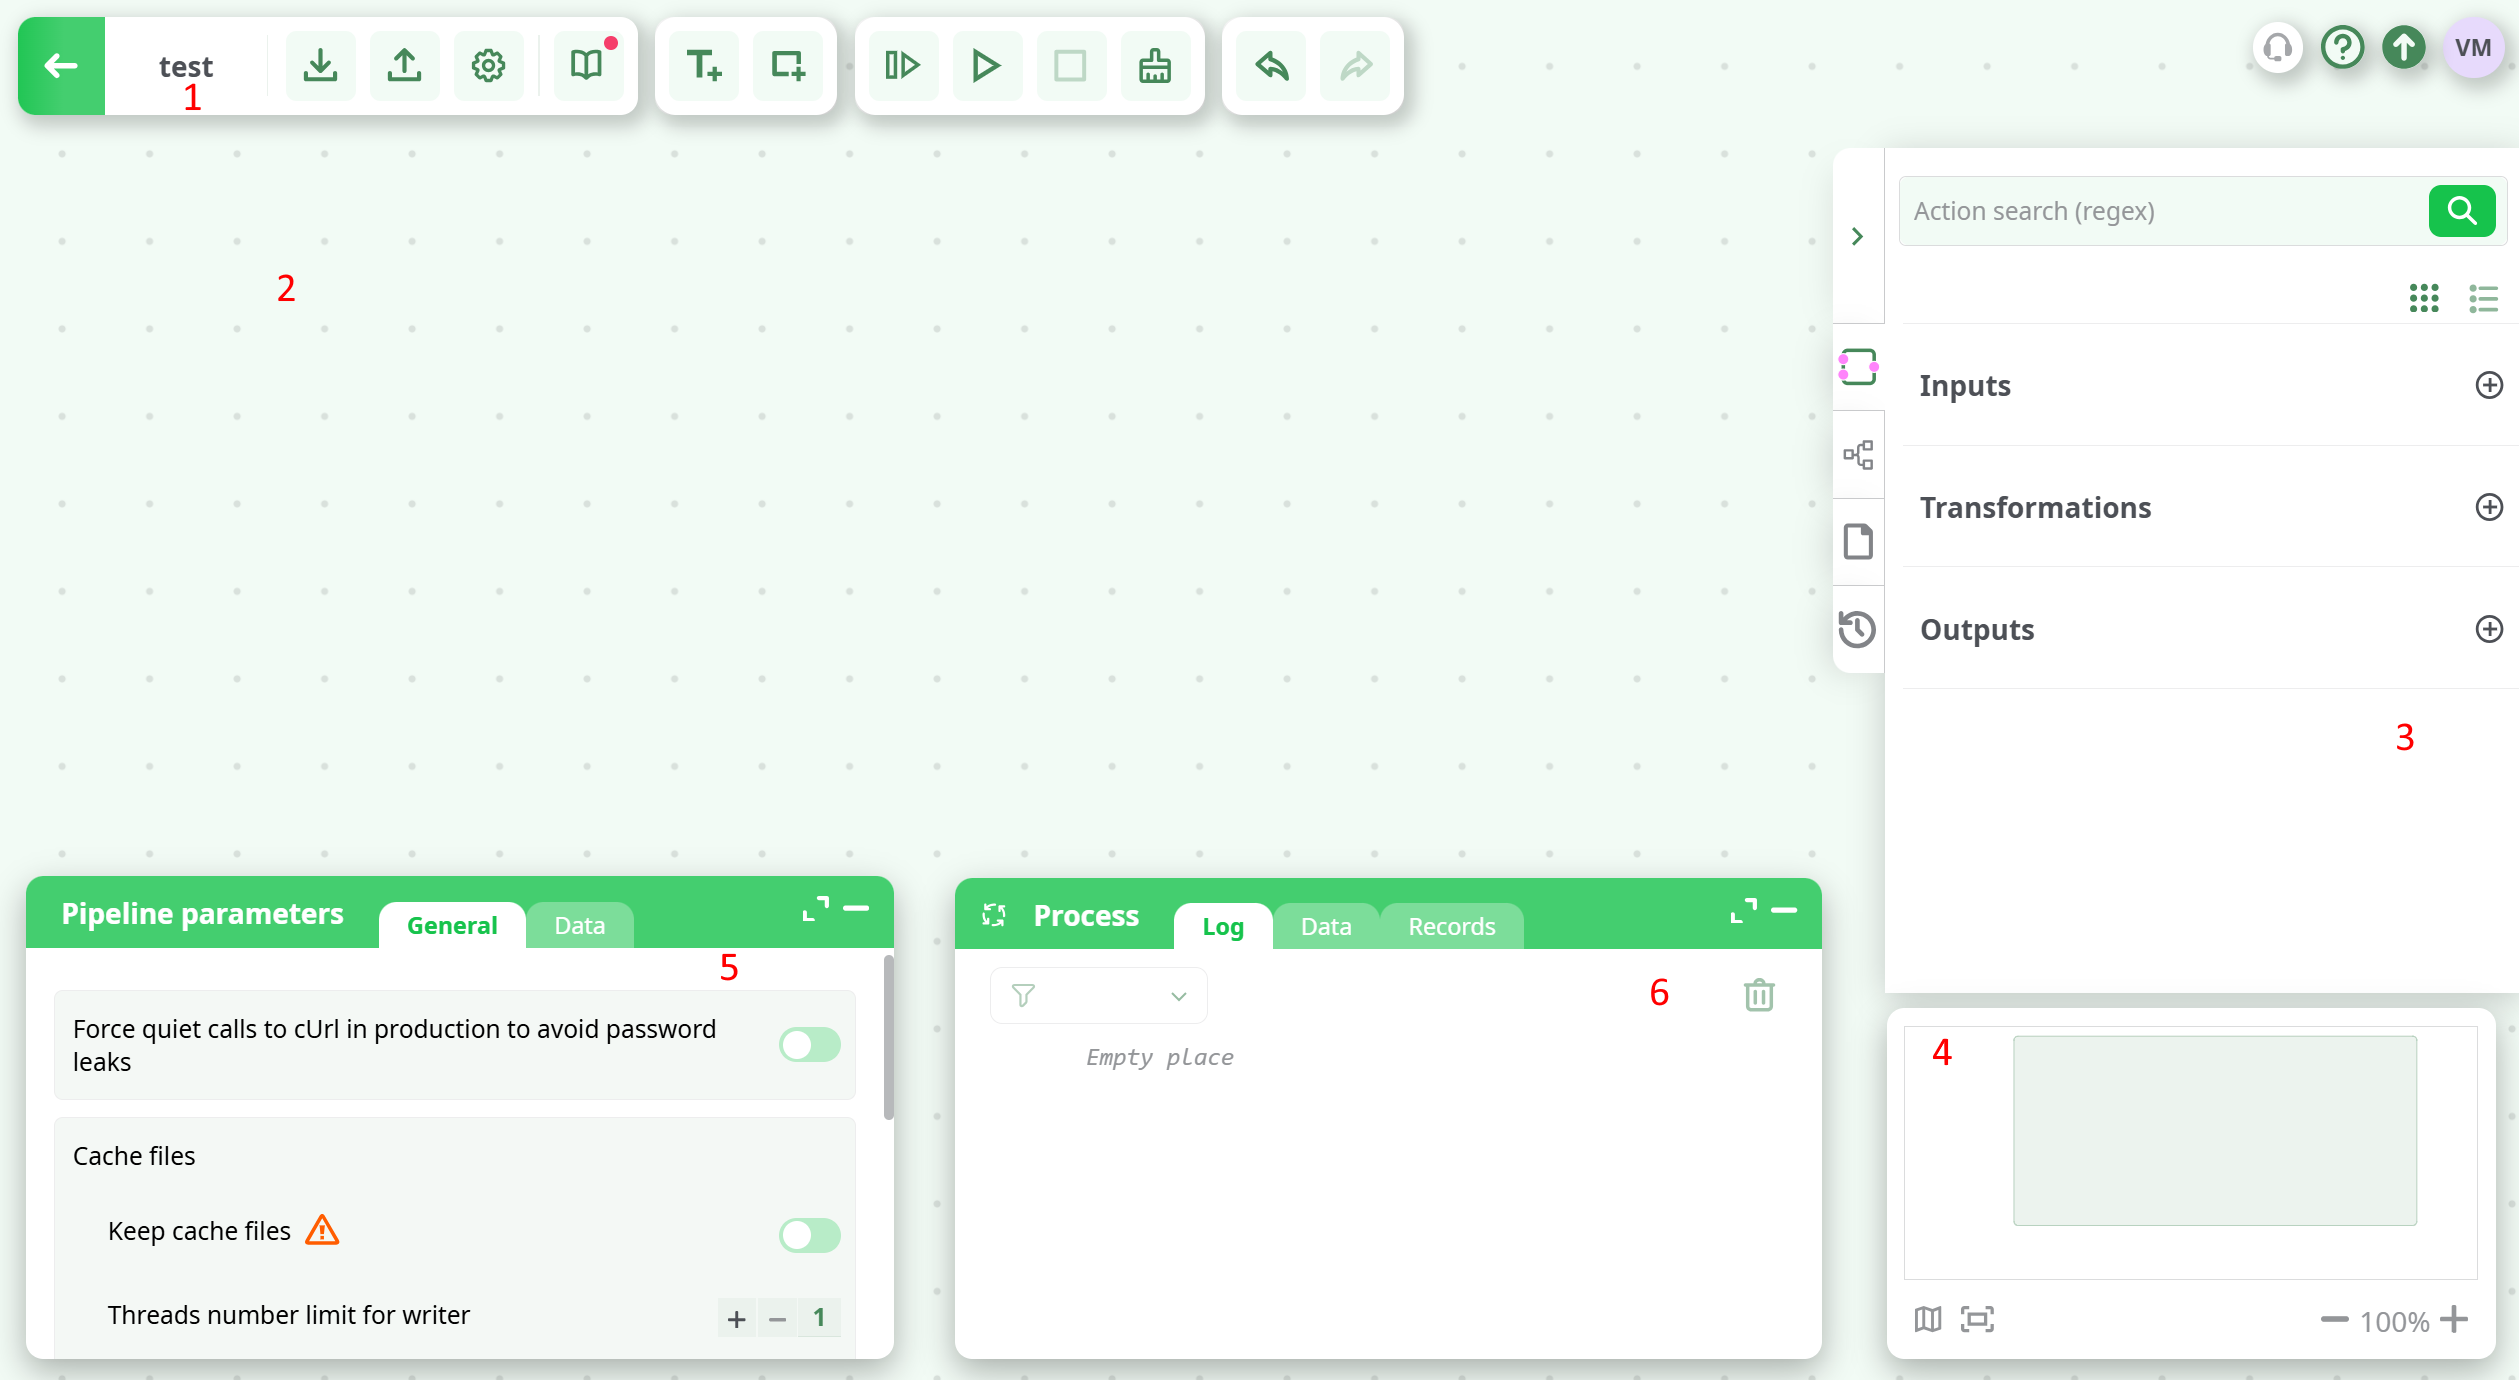
The pipeline editor allows the user to design its pipeline. User can access this design view by double-clicking on a pipeline name in the pipeline list view. It includes:
- Header toolbar (1)
- Pipeline canvas (2)
- Right panel (3)
- Overview (4)
- Pipeline and active action parameter (5)
- Bottom-right panel - Process (6)
¶ Header Toolbar

The header toolbar is composed of:
- Back to dashboard (1): go back to dashboard or pipelines page (depending on where you entered editor from).
- pipeline name (2): edit the pipeline name & description
- Export pipeline (3): export pipeline to a json (.apjson) file. The file may be imported into an other pipeline or project.
- Import pipeline (4): import a json (.apjson) file.
- Settings (5): open the settings menu
- Documentation (6): open the documentation markdown editor
- Execution toolbar (7): see Pipeline execution chapter
- Text annotation (8): add a free text annotation
- Group Background (9): add a colored background to identify functionnal groups
- Undo (10): undo last modification (limited to last 100)
- Redo (11): redo previously undone modification
¶ Pipeline canvas
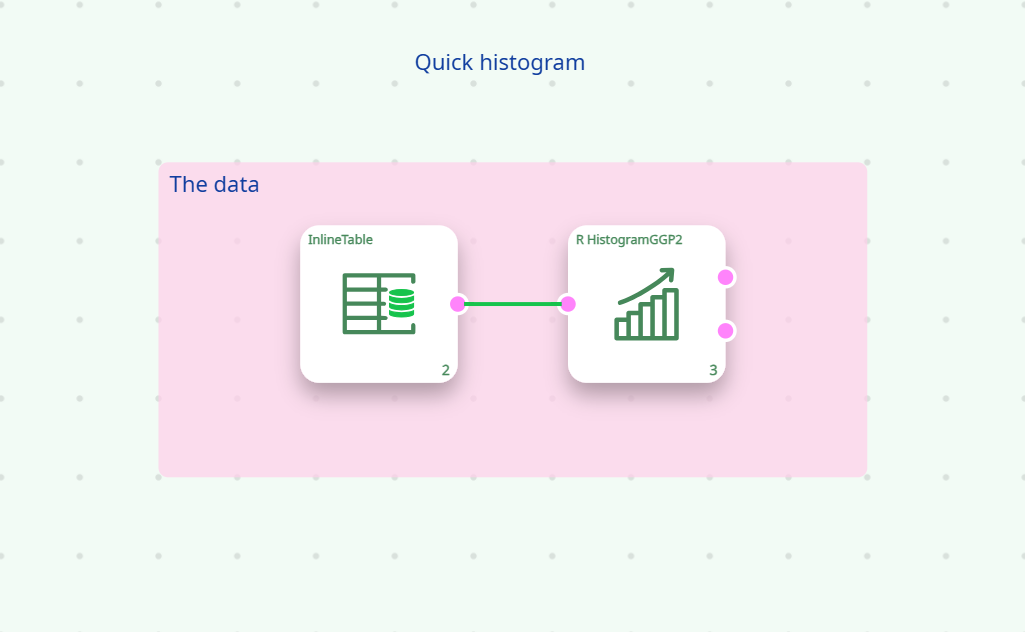
The main part of the editor is the canvas, which displays a graphical representation of the pipeline.
A pipeline is essentially a set of processing actions and connectors that represent the data flow
(see Pipeline creation).
For better design segmentation, group backgrounds (pink zones) can be added.
In complex pipelines, this helps visualize the structure and identify macro functions more easily.
A text annotation may also be added to indicate the purpose of each group.
Additionally, it is possible to attach a text annotation to any action as a quick note
(by clicking on the action and using the context menu).
Common mouse gestures allow you to select or move elements, text annotations, and group backgrounds.
A context menu appears when edit actions are available for the selected elements.
Many edition actions have a keyboard shortcut (see shortcuts)
¶ Right panel
The right panel offers 4 tabs:
¶ Actions catalogue
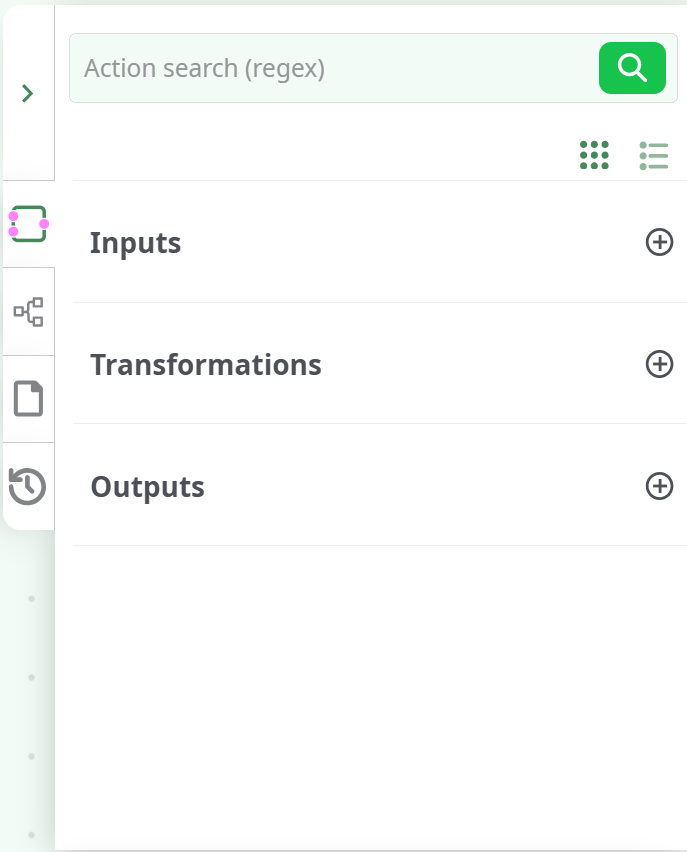
This catalogue contains all the input/transformation/output actions available.
Action catalogue is splitted in four categories:
- Inputs: set of actions to Extract data from various sources (files or DBs).
- Transformation: set of actions organized by categories to Transform the data.
- Outputs: set of actions to Load data (files or DBs).
An search engine is embedded in the processing action catalogue. It allows user to find a action through its full or partial name.
The  switch under the search form switches between detailed and compact list view.
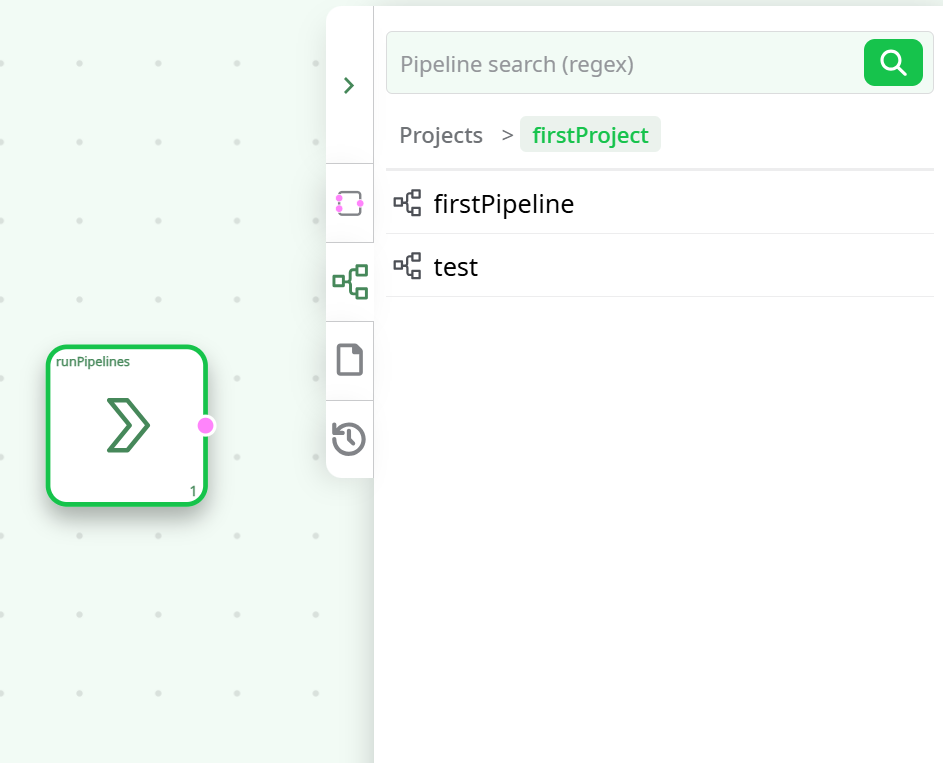
¶ Pipelines list

This tab shows the list of pipelines. It is useful when you want to execute a sub-pipeline from the current one.
However, do not use this as a way to clarify or visually organize your pipeline,
as it has implications on the processing flow and may negatively impact execution time.
On the other hand, using sub-pipelines can be very effective when:
- Splitting a very large table into chunks for parallel processing
- Creating a set of reusable atomic macro functions shared between projects
(e.g., a sign-in procedure for a service)
You can also add an existing pipeline directly into your canvas by simply dragging and dropping it from this list.
Doing so automatically creates a runPipelines action box,
which allows the selected pipeline to be executed as part of the current workflow.
¶ Files list
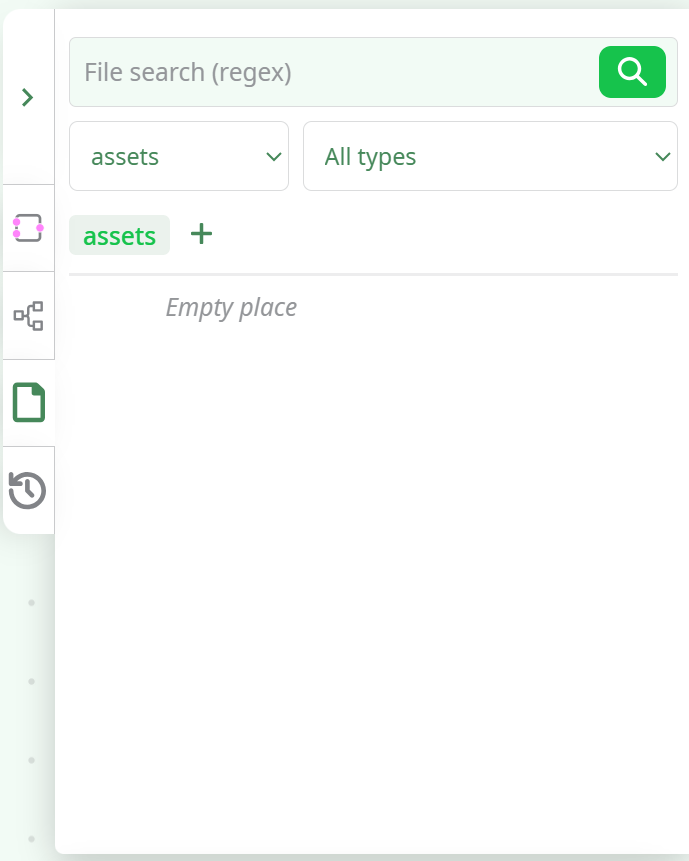
This tab shows the list of files, allowing, for unambiguous extensions, the automatic addition of the corresponding input action via drag and drop.
You will have access to files from the sources defined for the pipeline (see Pipeline parameters) and from the pipeline assets.
By dragging and dropping files from your OS file browser onto the canvas, they will be uploaded as assets,
and if the extension is unambiguous, the corresponding input action will automatically be added.
For example, dragging and dropping a .csv file will create a readCSV action box on the canvas.
Similarly, dragging and dropping a file directly from this Files list panel into the canvas will also create the corresponding input action automatically, provided the file extension is supported.
¶ History

This tab shows the history and version of the pipeline, allowing you to:
- View the evolution of the pipeline and see who made each change
- Disable specific past modifications
- Create a version from the current state
¶ Overview

The Overview panel provides a miniature view of the pipeline canvas and allows easy navigation within the workspace using simple mouse and keyboard interactions.
You can use the following shortcuts and controls to navigate efficiently:
- Ctrl + Mouse Wheel → Zoom in/out
- F → Zoom fit (focus the entire pipeline on screen)
- Shift + F → Zoom fit and close all side panels
- Shift + Scroll → Move horizontally across the canvas
You can click directly on the minimap to jump to a specific area of the pipeline
¶ Pipeline and active action parameter
This panel displays:
The panel can be resized using the dedicated buttons, either with a single or double-click depending on the desired dimensions.
You can also resize it by double-clicking on its header bar (or on a tab), or by dragging its top edge to adjust the height.
¶ Pipeline parameters

The Pipeline Parameters panel defines all configuration elements that can be used across a pipeline — including data sources, constants, secrets, service connections, and advanced runtime options.
It can be opened either by double-clicking on the canvas or from the top menu → Global parameters. Both actions open the same view.
¶ Overview
This panel centralizes all global settings for the pipeline.
It allows users to define and manage reusable resources and environment-specific parameters without modifying individual action boxes.
The panel includes four main tabs:
- Sources – defines accessible storage sources and disk images
- Definitions – stores constants and encrypted secrets
- Services – manages database and message broker connections
- Advanced – provides low-level configuration and cache management options
All users can modify pipeline parameters. However, any values inherited from external sources will appear as read-only.
¶ Sources Tab
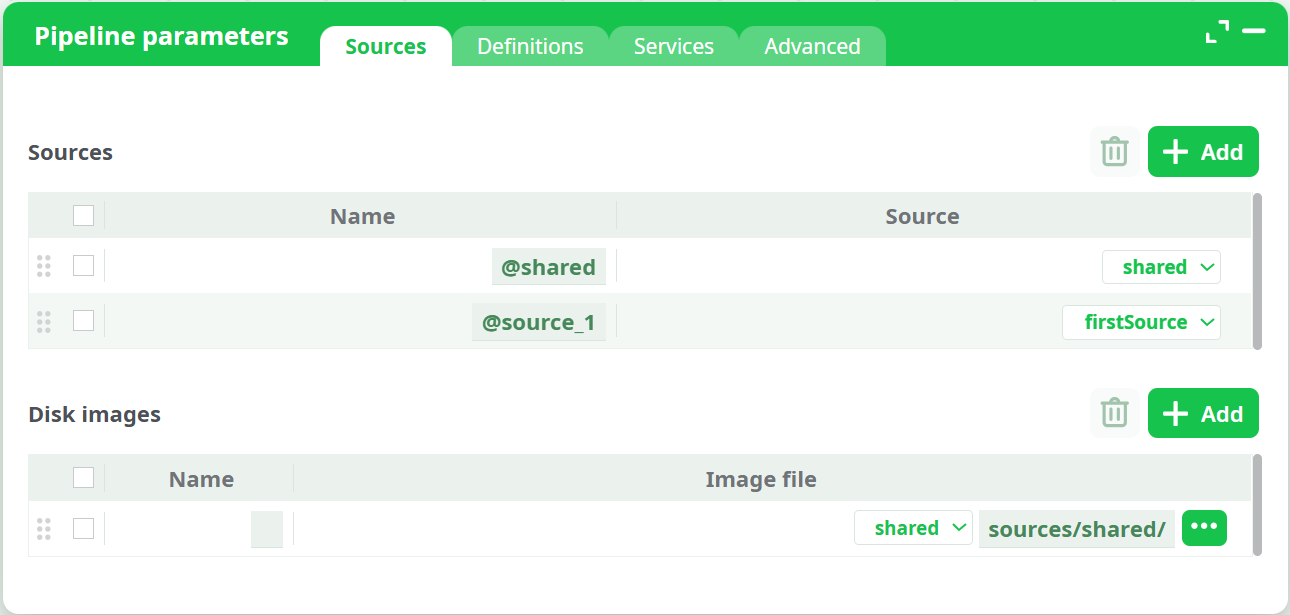
The Sources tab defines all accessible data sources and disk images for the pipeline.
-
Each entry has a Name (e.g.,
@shared,@source_1, etc.) and a corresponding Source reference. -
The dropdown includes all available locations such as:
shared– global shared workspacefirstSource,Test Source,beta source, etc.
-
New rows can be added using the Add button.
-
When a selected source contains its own Definitions, they automatically appear under the Definitions tab.
The Disk images section allows specifying virtual or mounted images, selectable by type:
- Assets
- temporary data
- recorded data
- JavaScript expression
- Sources
- Disk images
¶ Definitions Tab
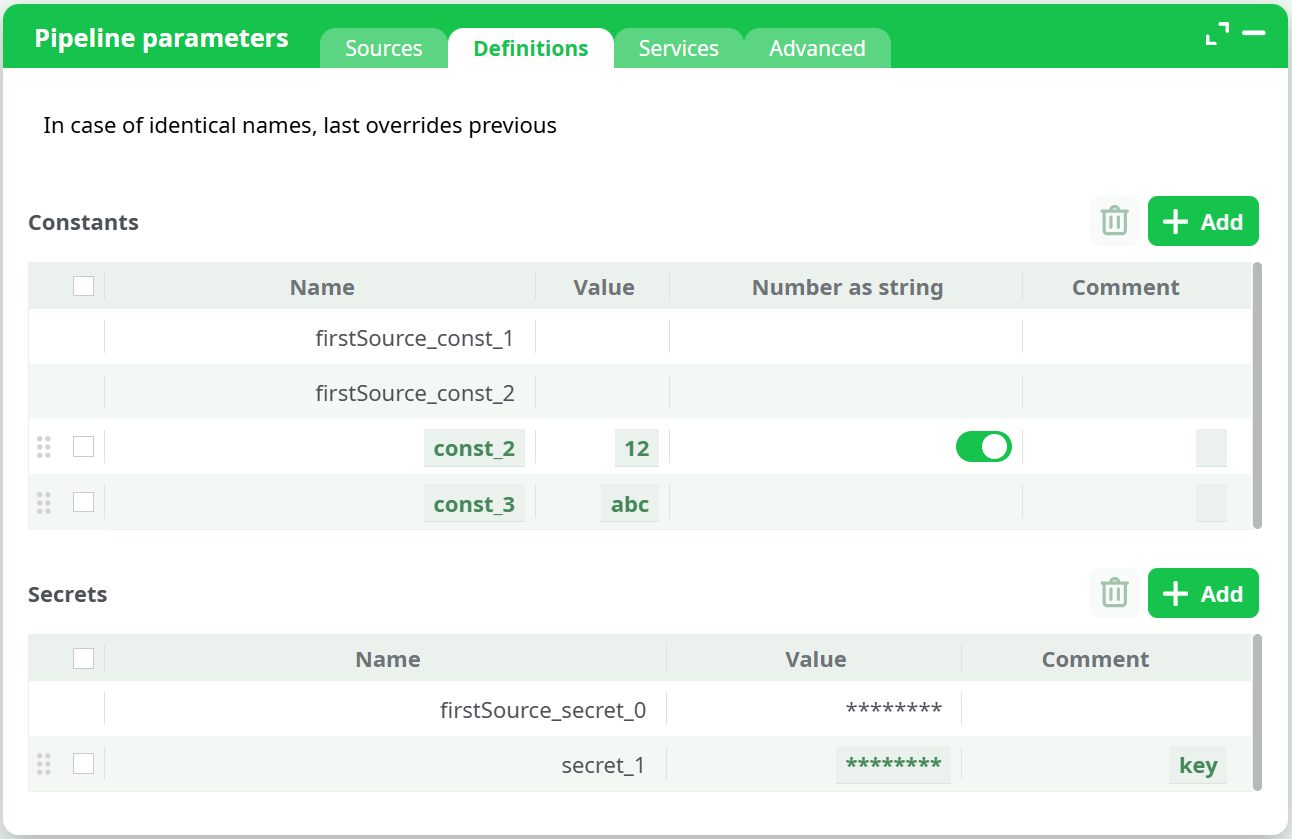
The Definitions tab manages reusable values and credentials that can be referenced across the pipeline.
It contains two sections:
¶ Constants
-
Used for storing static values such as URLs, usernames, or numeric identifiers.
-
The Number as string option ensures numeric constants are interpreted as strings when required.
-
Columns:
- Name
- Value
- Number as string
- Comment
-
Example:
Name: firstSource_const_1
Value: 2323
Number as string: Off
Comment: Connection port
¶ Secrets
-
Used for storing sensitive credentials such as passwords or API keys.
-
Secrets are encrypted in the ETL system and are decrypted only at runtime.
-
The values can be displayed again once you click on it.
-
Columns:
- Name
- Value (masked)
- Comment
If the selected source contains its own constants or secrets, they will appear automatically in this tab as read-only.
¶ Services Tab
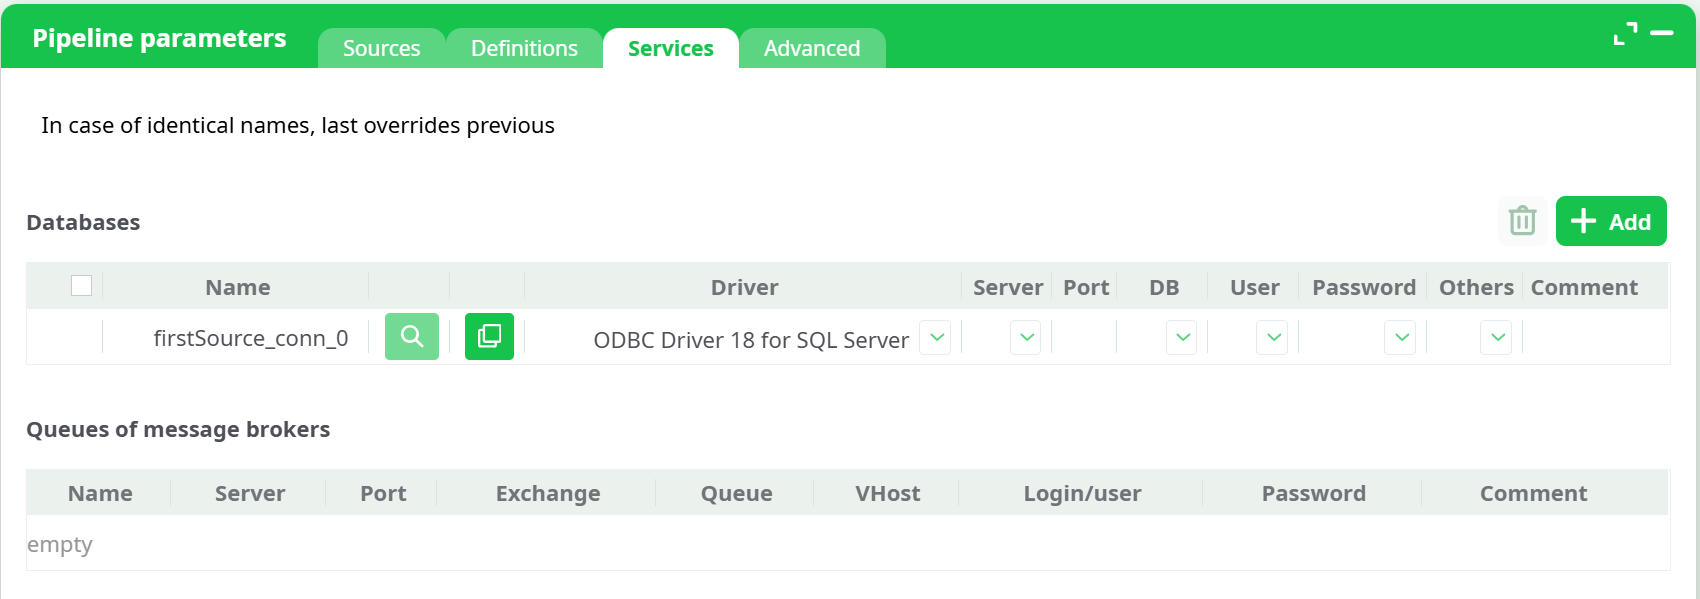
The Services tab defines all database and message broker connections that can be reused throughout the pipeline.
¶ Databases
Each entry represents a database connection with the following columns:
- Driver – selected from the dropdown (ODBC Driver 18 for SQL Server, PostgreSQL, MySQL, ClickHouse, MariaDB, MongoDB, Oracle OCI, etc.)
- Server – host or IP address (can be typed or selected from constants)
- Port – numeric port value or constant
- DB – database name
- User – login name or constant
- Password – secret reference
- Others – additional connection parameters
- Comment – optional notes
All fields can be:
- Typed manually
- Filled from dropdown lists, which include constants or secrets defined in the Definitions tab
You can also:
- Use Copy connection to duplicate an existing setup
- Add or remove entries using the Add and Delete buttons
¶ Queues of message brokers
Section reserved for configuration of messaging services.
Currently, this section remains empty until queue-based connectors are defined.
In case of identical names, the last overrides previous.
¶ Advanced Tab
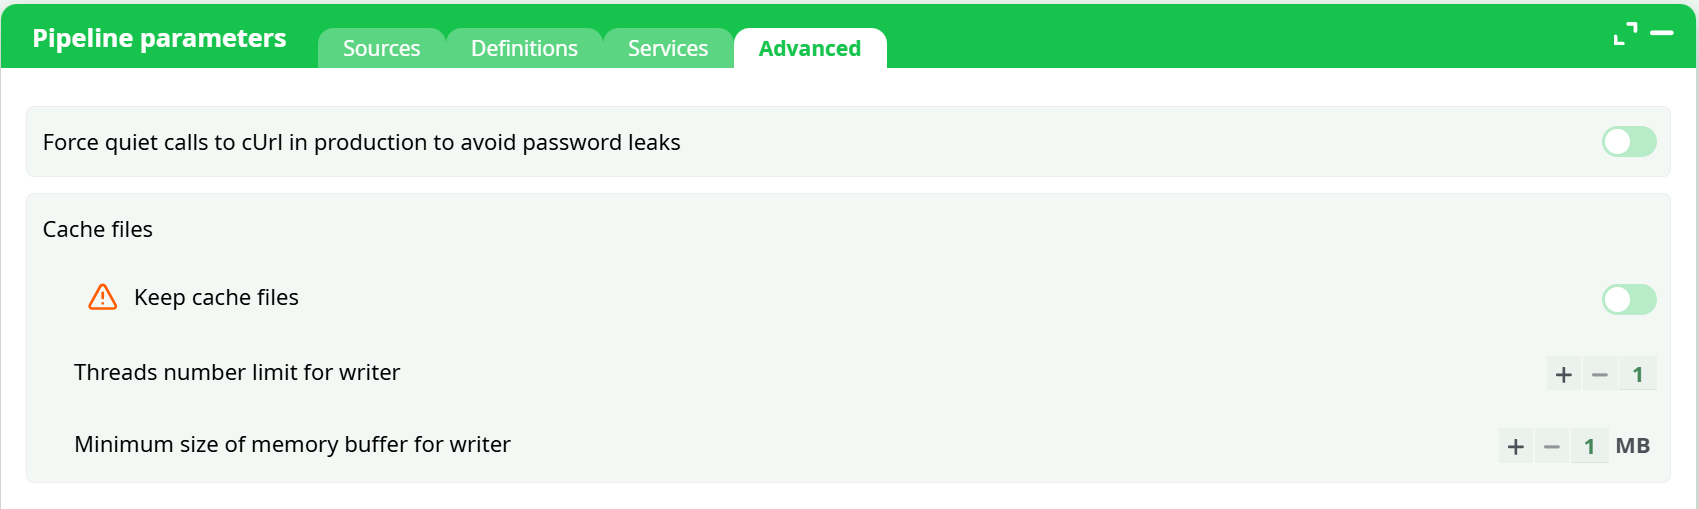
The Advanced tab gathers technical and cache-related options controlling pipeline execution.
Options include:
-
Force quiet calls to cURL in production – prevents password leaks in logs.
-
Cache files section:
- Keep cache files toggle
- Threads number limit for writer
- Minimum size of memory buffer for writer (MB)
These settings affect runtime behavior and performance tuning for production environments.
¶ Active action parameters
When working with pipelines, each action (or “box”) has its own configurable parameters.
The parameter panel automatically displays the settings of the currently active action.
When you double-click on an action, it becomes active and its parameter panel appears below the canvas.
Only one action can be active at a time — the active one is visually outlined with a thick border.
To deactivate it:
- Double-click again on the same action (to close its panel), or
- Double-click anywhere else on the canvas, or on another action.
Each panel typically includes several tabs such as Parameters, Description, and Configuration, depending on the action type.

¶ Developer Mode Overview
Some pipeline actions provide a Developer mode toggle, visible to users who have permission to modify or inspect scripted actions.
This mode is primarily available for scripted boxes (JavaScript, Python, or R), but may also appear in other customizable components.
It is not available when the script is encrypted.
When enabled, Developer mode reveals advanced options and additional tabs that allow you to:
- Edit the action’s parameters and metadata
- View and modify its source code
- Configure publication settings for reusable templates
- Customize how the action appears in the right-side panel
When Developer Mode is enabled, additional tabs appear alongside the standard ones:
Parameters - Define and manage all configurable fields (IDs, types, and default values).
Description - Add notes or instructions visible to users of the box.
Code - Edit the source code in JavaScript, Python, or R.
Configuration - Internal settings for behavior and input/output management.
Publication - (Only for template, pythonTemplate, and rTemplate actions) — allows publication and customization of the action.
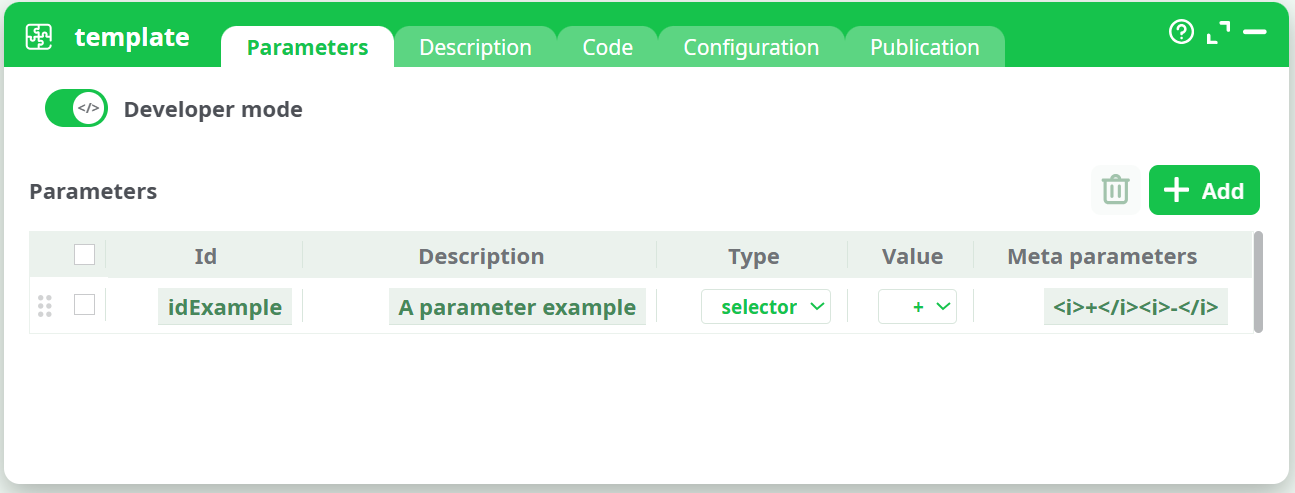
¶ Parameters Tab in Developer Mode
In Developer Mode, the Parameters tab expands to display a full editable table of configuration fields.
Each row defines one parameter with the following columns:
- Id – Unique internal name of the parameter.
- Description – Human-readable label shown to end users.
- Type – Defines the parameter input type.
- Value – Default or selected value.
- Meta parameters – Optional extra configuration (e.g., filter lists, accepted file types, validation rules).
Users can add new parameters with the Add button or remove existing ones with the Delete button.
¶ Available Parameter Types
The following parameter types can be assigned:
boolean, double, string, password, color,
selector, one column, many columns,
output file, input file, multiple input files, directory, global parameter.
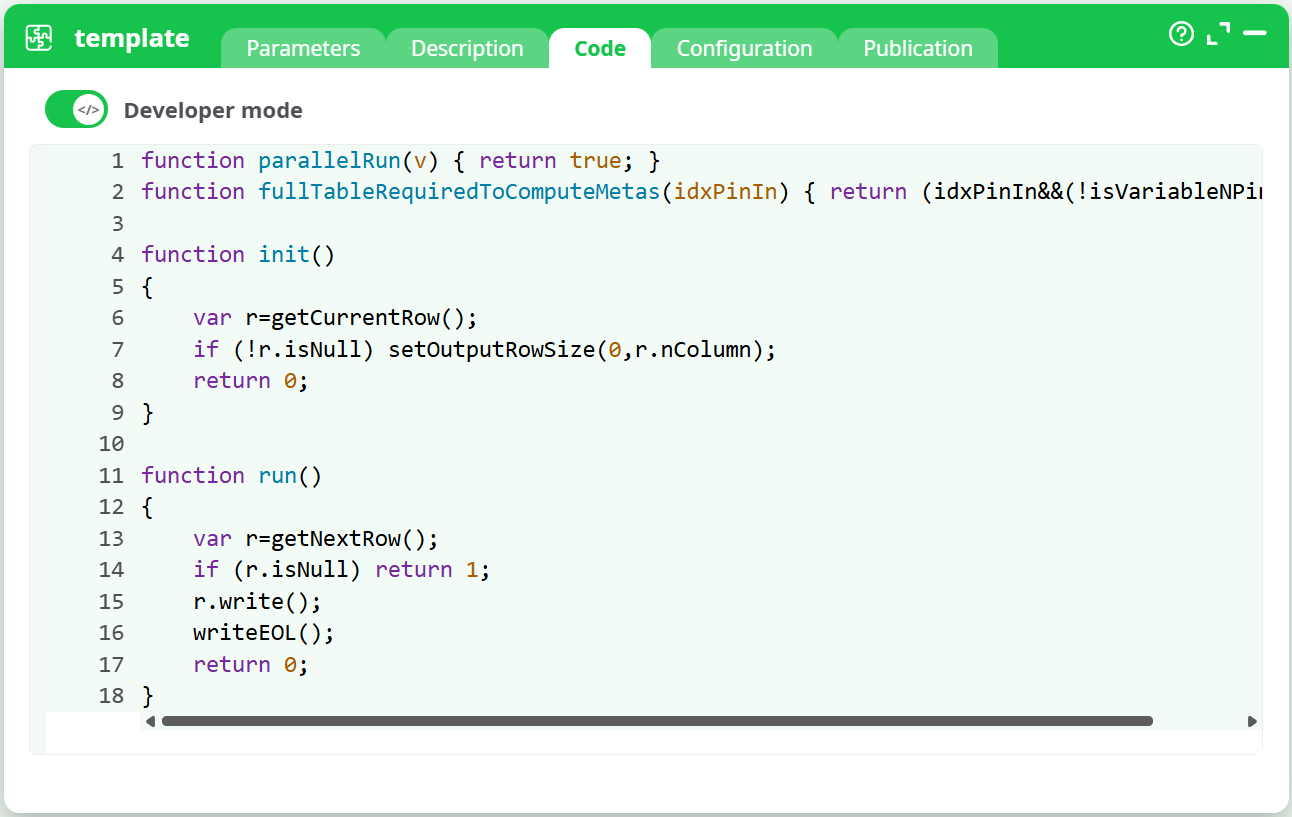
¶ Code Tab
The Code tab provides full access to the action’s logic, depending on its scripting language.
It includes syntax highlighting and functions such as init(), run(), or other process-related methods.
This area allows advanced users to:
- Write or modify the code executed by the action.
- Control how data is read, transformed, and written between pins.
- Debug or optimize execution flow.
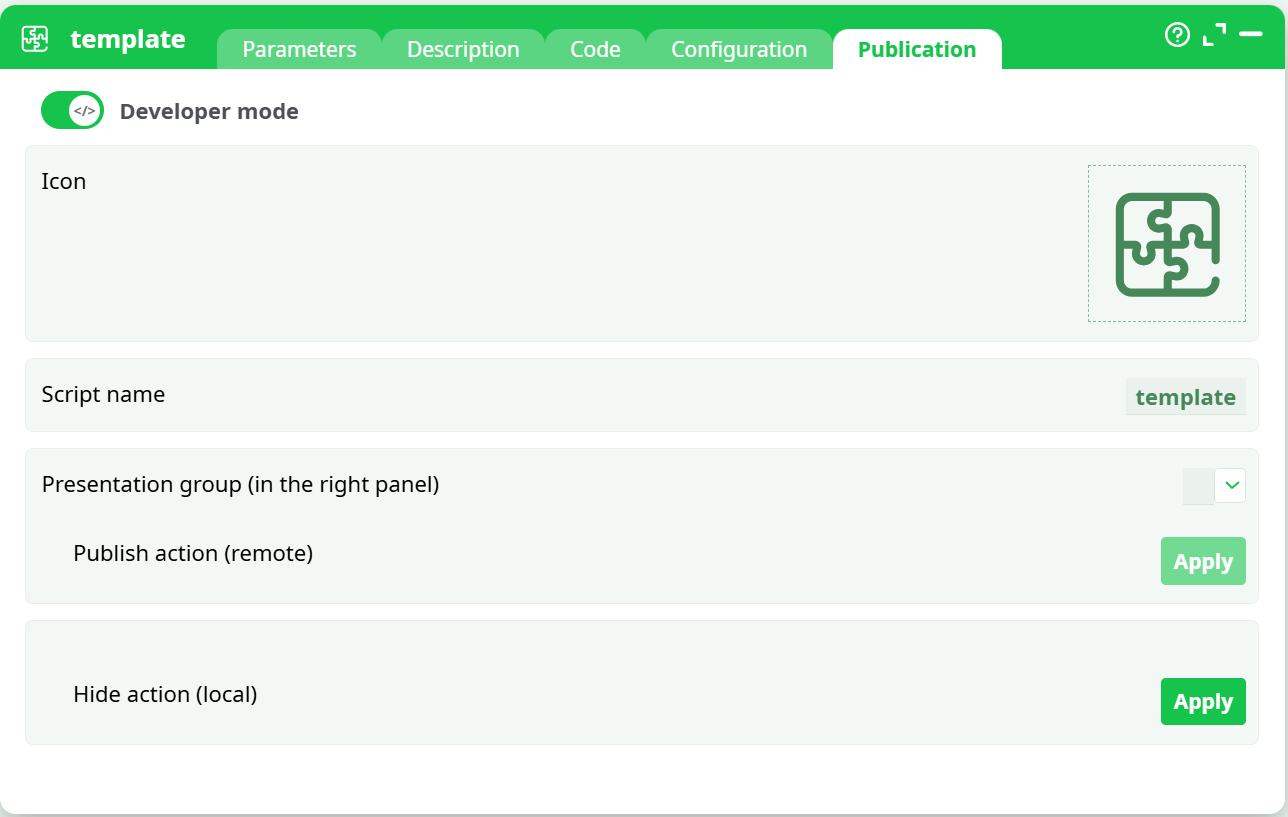
¶ Publication Tab
The Publication tab is available only for template-type actions (template, pythonTemplate, rTemplate).
It enables you to customize and publish your action within the right-side library panel.
¶ Options Include:
- Icon — personalize the box icon .
- Script name — rename the script; this becomes its visible title in the library.
- Presentation group — choose the category (e.g., COMMONINPUT, TEXTMINING, CLOUDSERVICES) where the action will appear.
- Update / Hide / Delete actions — manage visibility or updates of the action.
After applying changes, the action becomes visible under the chosen category in the right-hand panel.
¶ Bottom-right panel - Process
The Process panel displays the execution details, output previews, and generated files for the active pipeline.
It automatically opens at the bottom-right of the workspace when a process (run or preview) is triggered.
This panel contains three main tabs:
- Log – Execution logs of backend computations
- Data – Output table preview of selected pins
- Records – Files and images generated during execution
¶ Process – Log
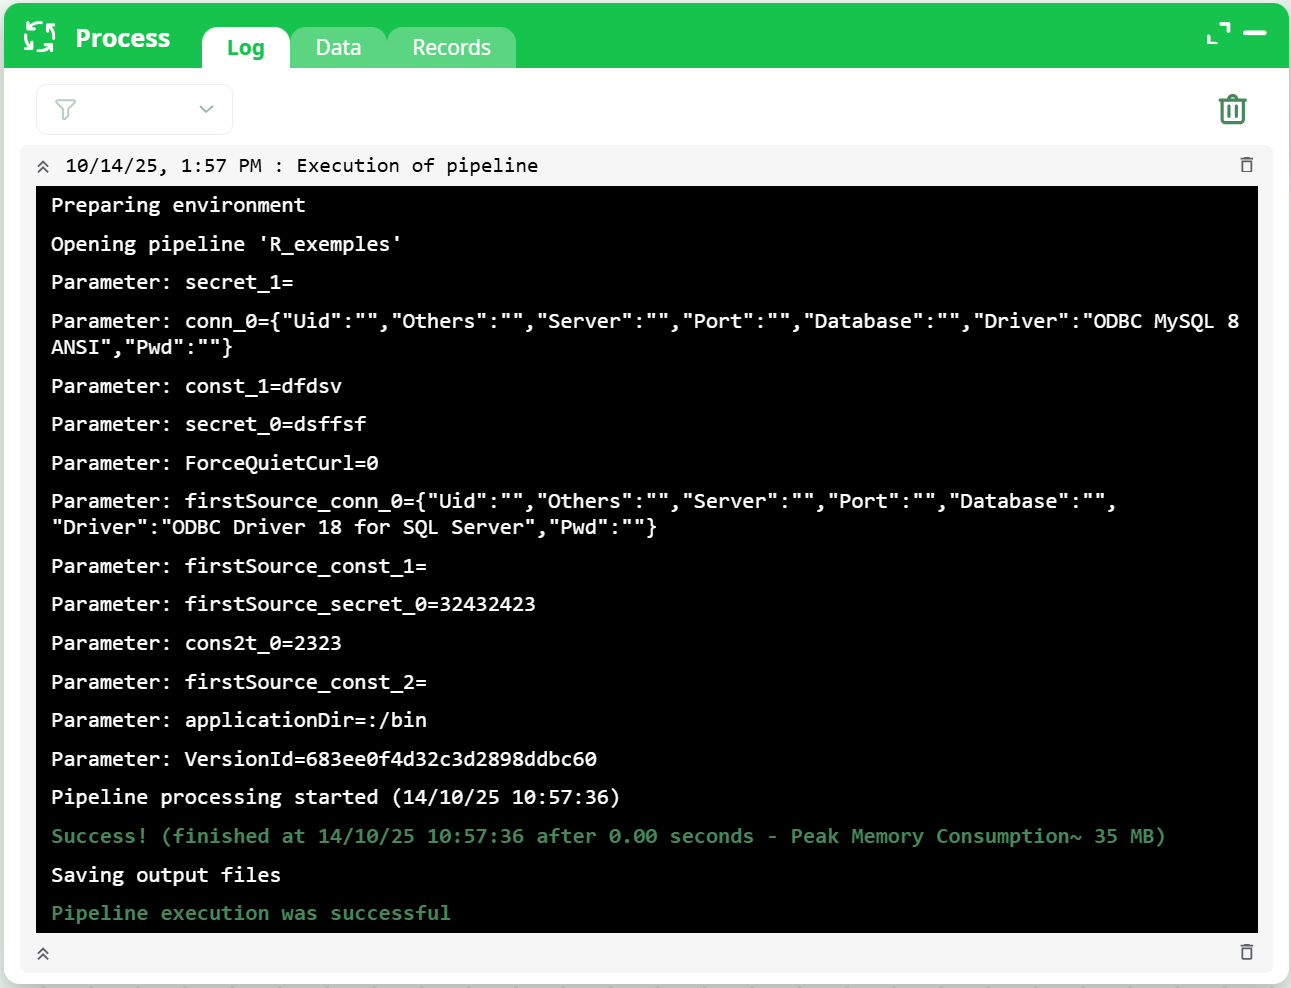
The Log tab records every action related to pipeline execution. Each entry corresponds to a Run, Preview, or List Columns command.
¶ Key features
- Each log entry can be expanded, collapsed, or deleted individually.
- The trash icon in the toolbar removes all stored entries.
- If a command is currently executing, its entry remains protected until completion.
- A filter tool (funnel icon) allows isolating logs related to a specific pipeline execution or sub-pipeline.
When developing or debugging, these logs are crucial.
Some actions also provide a Debug mode option that increases log verbosity for deeper inspection.
For additional details on execution flow and debugging, see the Pipeline execution section.
¶ Process – Data
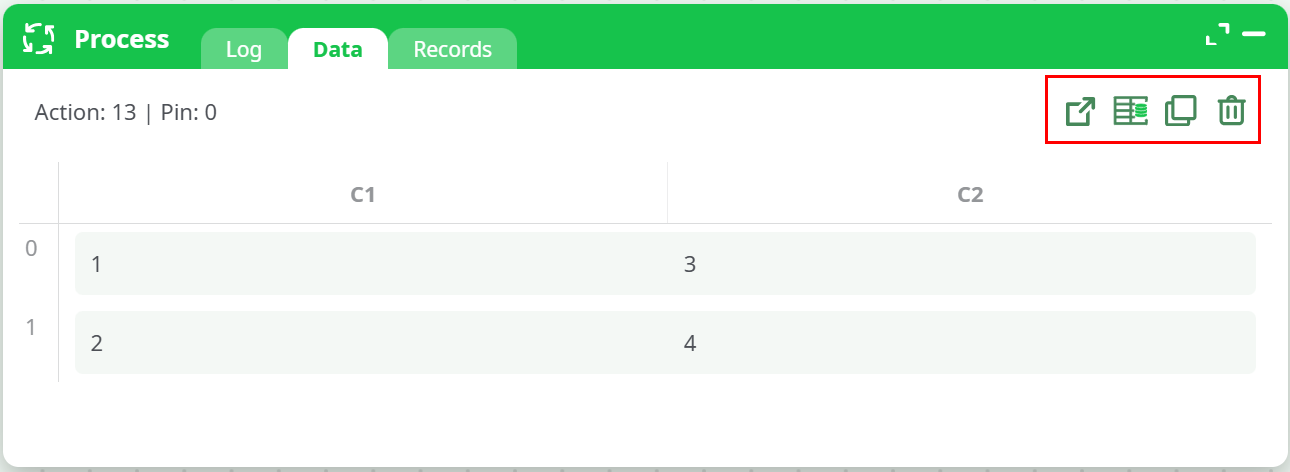
The Data tab displays the result table at an action’s output pin when a Preview is requested.
¶ Toolbar icons
- Open a copy in a new tab – Opens the same table in a new in-app panel for side-by-side viewing.
- Create an InlineTable from this data – Instantly creates an InlineTable box under the current action containing this dataset.
- Copy table to clipboard – Copies the previewed data for external use or quick duplication.
- Delete – Removes the current preview from the Process panel.
When used in a copied tab, the tab itself is closed.
¶ Additional information
- When a cache file exists, you can navigate to any row using the Go-to-line field in the toolbar.
- By default, only the first 100 rows are loaded for performance; additional data can be accessed via cached previews.
- If a user lacks access to the underlying data source, only column names are displayed; all cell values are obfuscated.
- Each dataset preview remains active until manually closed or the page is refreshed.
¶ Process – Records
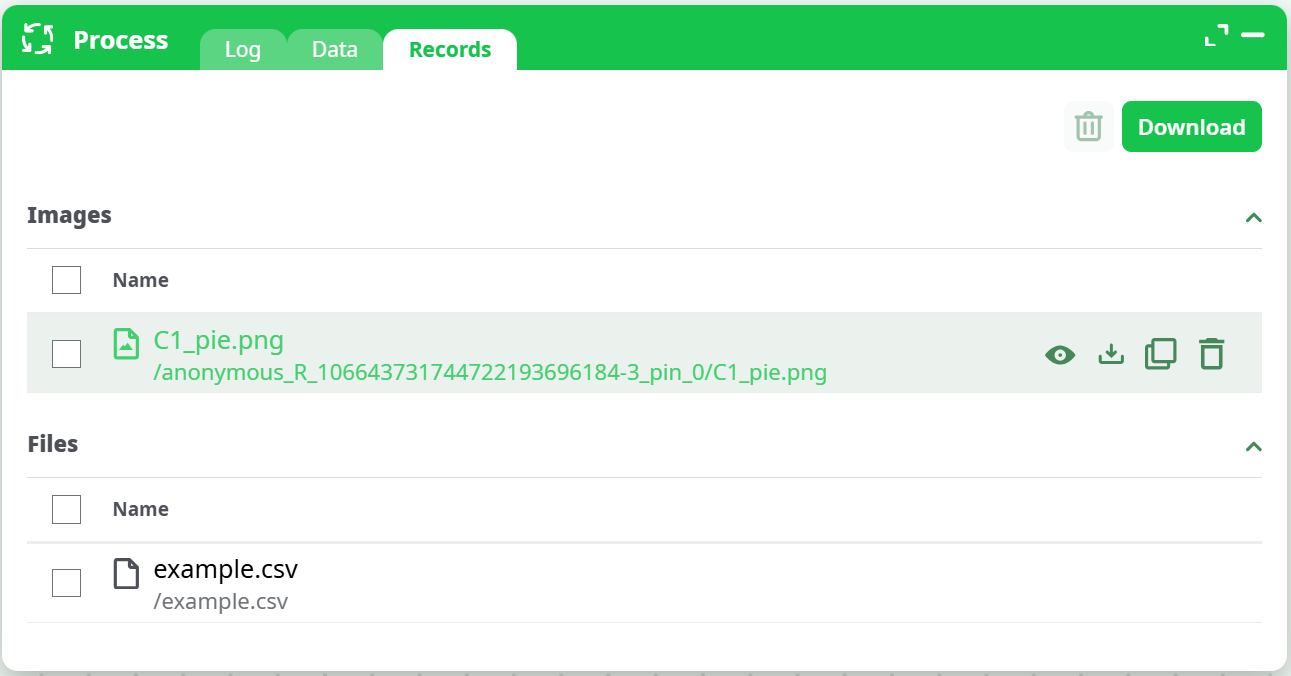
The Records tab lists all files and image outputs generated by the pipeline.
¶ Files section
-
Displays every file created by actions (e.g.,
.csv,.json, or unspecified file extensions). -
Each record includes buttons to:
- Copy path
- Download (single or multi-file)
- Delete
-
Selecting multiple files enables bulk download or deletion using the top toolbar.
-
When downloading, files retain their defined extension.
If the output path has no extension, the file will be downloaded as a generic file.
¶ Images section
-
Shows all image outputs produced by actions (e.g.,
.png,.jpg). -
Images can be:
- Previewed inline directly inside the Records tab.
- Double-clicked to view full-size.
- Ctrl + double-clicked to open in a new browser tab, which is especially useful for interactive HTML results.
-
For actions supporting HTML outputs (e.g.,
HTML documentorinteractive HTML documentoptions),
the generated file opens in a separate browser tab allowing direct interaction.
Example: An R visualization box may produce
C1_pie.png,C1_pie.html, orC1_pie_interactive.html.
The preview appears inline, while Ctrl + double-click launches the full interactive view.
¶ Next step
Start to a new pipeline design.